Wednesday, July 3, 2013

How to Write a Restaurant Staff Schedule


1. Staff Order – When listing staff members on the schedule, list them in the following order:
a) Lead Server
b) Server Trainer
c) Seniority
Why this order? For starters, your key people such as your leads and trainers need to be listed first as a sign of respect and responsibility. Then list your servers by seniority.

2. The Busiest Times Require Your Best People – Schedule your strongest people for the busiest times. It’s imperative that you place the right people in the right situations. For instance, if you schedule all new people for your busiest meal period, you may have mayhem and confusion.

3. Everyone should have Opportunities to Make Money – Make sure your new, less senior, staff get at least one money-making shift. If you just take care of your more senior people with the money-making shifts, you will have high turnover and a majority of poorly performing staff, because there is another job across the street that will give them an opportunity to make money.

4. Everyone should know the Day Shift – Have all staff work at least one day shift. Doing this allows you to make sure less senior staff have an opportunity to work money-making shifts. It also allows for a stronger lunch shift, which in turn increases sales and ensures that lunch will go well so that busy business people will come back.

5. The Backward Scheduling Priority – Number your days by scheduling priority and schedule back to the lowest priority. A common mistake a manager makes when scheduling is to start writing a schedule on Monday and finishing on Sunday. We have already talked about pitfalls in utilizing this strategy. From now on, number your days, 1 being the busiest to 7 being the slowest. Then start scheduling backward, from 1 to 7. This will ensure you have your strongest people in your busiest shifts.

6. Give them Personal Time – Schedule two days off in a row whenever possible and avoid split days off. If you split-schedule people’s days off, they never get the day just to relax; they only get to do their to-do lists. Giving them two consecutive days off improves employee morale.

7. Close/Opens, the Quickest Ways to Mediocrity – Stay away from scheduling close/opens. What is a close/open, and why not schedule them? A close/open is when a staff member closes the night before and is scheduled to open the next morning. Sure, this is one way to fill in the manpower gaps, but it your ticket to mediocrity.

8. What to do When You are Over Staffed – If you have more staff available than shifts to fill, give shifts to your full-timers first. Part-timers and/or your weakest staff lose shifts first. If you find yourself in a situation where the seasonality of your business has you with too many servers for the sales you have coming in, take care of your full-timers first. Make sure they continue to have the opportunity to make money, because they are your backbone. Start to trim shifts from your part-timers.

9. Staff Up, Not Down – Always have two more Full Time Equivalents than you need. A Full Time Equivalent is whatever number of people it takes to equal one full-time person. Hourly workers like the ability to change their schedule from one week to the next to take advantage of vacations, events, friend and family in town, and parties, to name a few. With this in mind, even the most perfect manpower plan can be thrown an unexpected curve.

10. A Request is a Request – Remember, scheduling requests are just that - requests. The needs of the business must come first. When staff put in for a day off, you need to find a way to give it to them, while reserving the right to say no. If you say no, they will most likely take the day off anyway and find a job where they can be more flexible.

11. Management is Required – Any schedule changes must be initialed by a manager. Look at hours worked and stay away from over-time. Start by writing your schedule in pencil. When you have your final version ready to be posted, photocopy it and post the photocopy. This way any changes to the schedule will be apparent. Next, make sure all schedule changes are initialed by a manager. When the request is made, go to the schedule and look to see how many hours or shifts the person taking the shift has or will work that week.

12. Post Quickly and Consistently – Have the schedule written and posted by Thursday at 4pm. Have you ever had manager post the schedule on Sunday at close for the next week that starts on Monday? The staff cannot plan their week and the restaurant often finds itself in trouble because staff is late or a no-show due to the lack of notice. Have respect for your employees’ time. Accept scheduling requests until Tuesday night, write the schedule on Wednesday or Thursday, and post it by Thursday at 4pm.

13. Use a Scheduling Key – When filling out a schedule, x-out the days people cannot work, place an R in the days people have requested off, and place a V in the days people have requested off for vacation. Then start scheduling shifts. If you take the time to prepare for the scheduling process, you will eliminate opportunity for errors and will demonstrate to your staff that you CARE, that you have Concern And Respect for Everyone. Following these steps will keep employee morale high and when morale is high, so is productivity.

Wednesday, June 12, 2013

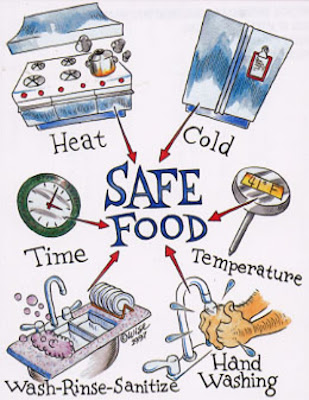
Kitchen Cheat Sheet

You'll need to copy and paste this image into a graphics software or document software to read. A lot of great basic information.
 

Thursday, April 25, 2013

Tips for Short Order Lunch Menu Production

Many of these tips may seem obvious to the seasoned line cook, but they are none the less essential for operating a short order cook's line:

TIP 1:

Prep as many steps ahead as you can, so that during service, it requires only a few steps to finish a dish. EXAMPLE: For a menu item such as a cobb salad, all the individual ingredients would be prepped ahead: tomatoes diced, eggs sliced, bacon cooked and diced, blue cheese crumbles and dried cranberries in containers, lettuce washed and cut, chicken breast cooked, chilled and diced, etc.

     All that would be necessary to complete your salad would be assembly in a chilled bowl. Upon order, this menu item will take less than a minute to prepare.

TIP 2:

Prepped ingredients should be stored where it is most handy for a line cook to reach them. A refrigerated sandwich prep table that includes a flip top lid, various slots for sixth pans, a cutting board surface (for slicing sandwiches, quesadias and other items on the fly) and a lower storage unit is necessary.

TIP 3:

EVERY PREPPED ITEM SHOULD HAVE IT'S VERY OWN PLACE TO BE STORED!
Why the caps and exclamation point? Yes, I AM yelling at you! Every cook in your kitchen should know the exact location of products (this includes within your walk-ins, canned storage, dry storage, chemical storage, etc). Thus, if a busy line requires anyone from another cook to a chef to step in to help, there is no delay due to hunting for sliced tomatoes, as an example. Busy kitchens can be chaotic enough. CONTROL THE CHAOS.

Tip 4:

Timing of menu items that are on the same order so that they are all completed at relatively the same time is key.

     For example, an order that includes a burger with fries, a cobb salad and a Rueben with coleslaw, would be prepared in this fashion.

     The burger would be started on the broiler (the meat patty having already been potioned out ahead of time) since this is the item that will take the longest to cook.

     The fries would be dropped into the fryer next, since they can cook unattended, and can hold well before the burger they accompany is cooked.

     Let's start the rueben: the sliced corned beef goes onto the flat top. Next, we will brush melted butter onto two slices of rye bread, which will then be placed on the flat top to grill. Next, two slices of swiss and a squirt of 1000 island dressing will be added to the bread. A half cup of saurekraut goes on the flat top next. Check your burger!

    Next, since the salad can be assembled in about a minute, we'll do that next. Of course, we'll keep in mind that the burger needs to be flipped. So far, two minutes has transpired.

     Your fries are ready! Tranfer to a pan equipt with a heat lamp, season with salt.

     Check your burger! If done, set to the side. Proceed to set up your plate: bun, (toasted ahead as part of our morning prep), LTO (Lettuce Tomato and Onion) set-up (pre-set by the dozens as part of morning prep) and pickle slices. Add your patty and fries.

     Assemble your Rueben, slice and plate with pickles.

    Your server will provide the coleslaw for the Rueben and dressing for the cobb.

Your order is complete in around four to six minutes, typical for lunch rush.

I'll add more production tips im my next post.

Happy cooking!


Wednesday, April 24, 2013

How to Calculate Food Cost

It doesn’t matter that you have the best menu in town, a high-traffic location, beautiful decor and rave reviews if your restaurant charges $12 for a meal that costs you $13 to serve. Your cost to serve a meal includes both overhead costs and the actual food on the plate. Miscalculating either is a recipe for disaster.

Step 1

List the ingredients of the dish you are appraising. Include even small amounts of food, including a squirt of ketchup or spoonful of mayonnaise. Don't forget to account for cooking oil, seasonings and garnishes as well. Every dish should be portion controlled to ensure each chef serves the same meal at the same cost.

Step 2

Calculate the cost of each ingredient in each dish. For example, if a tomato costs 25 cents and each one yields eight slices, the tomato cost for a dish that includes two slices would be about 6 cents. Include a proportion of any delivery fees, interest, returns charges or other expenses directly related to purchasing foods.

Step 3

Add the total cost of the ingredients to calculate your food costs for that dish. Do not include the labor costs to prepare or serve the dish.

Step 4

Divide the menu price by the food cost to determine the percentage of the price that comes from food to begin determining if you have priced the meal correctly. For example, if you sell a meal for $18 and your food costs for that meal are $6, your food cost is 33 percent.

Step 5

Calculate your overhead cost per meal served. This includes all of the nonfood costs to run your restaurant, such as labor, rent, marketing, taxes and other expenses. Determine a daily overhead cost to run the restaurant and divide that by the number of customers you estimate you will serve each day. For example, if your overhead is $2,000 per day and you serve 250 customers daily, your overhead cost per person is $8. Include allowances for employee meals and food theft in the overhead figure, since these are not direct costs to serve a customer meal.

Step 6

Determine the target food-cost percentage you want for your menu items. Use your overhead costs to guide you. For example, if you sell a meal for $12 and have an $8 overhead cost, your food costs must be no more than $4 to break even. If you want a profit of $2 per plate, your sales price would then need to be $14, giving you a food-cost percentage of about 29 percent. If you feel your market will not support meals that cost more than $14, your chef will need to prepare menu items for no more than $4 each. If you sell meals for less than $14, your chef will need to use less than $4 of ingredients per meal, using your 29 percent guide.

Step 7

Examine your current menu prices to determine whether they cover your overhead and foods costs, and return a profit. Use your target food-cost percentage to do this. For example, if you determine that your food costs can be no more than 20 percent and a particular meal uses $4 of ingredients, you must sell that meal for at least $20.

Step 8

Determine whether you need to calculate different food cost percentages for different services or items. For example, a low-cost breakfast menu might require food costs to be less than 20 percent of the ticket since profit margins are small. A more expensive dinner menu might support foods costs as high as 35 percent per plate.

Step 9

Analyze your sales by item to see if your food-cost percentages can support your business. If you determine that you are selling mainly low-cost items, you may need to raise those prices -- or lower your food costs -- to be profitable. Look at total food costs per service and divide by total sales to get a more complete picture of your food costs without having to calculate the actual cost of each menu item.

Sunday, April 21, 2013

Cross Utilization of Ingredients Throughout Menu

     Cross utilization of ingredients throughout your menu is crucial to maintaining food cost, avoiding spoilage and controling ordering.

Example:

     A menu that includes say, a burger (ingredients which include lettuce, tomato, onion, choice of American or Swiss) should also include items that rely on the same ingredients. In this example, we'll use a Chef's Salad, which will use many of the same ingredients as our burger platter. By "cross utilizing" ingredients, many individual menu items can be created. Why is this an essential part of menu design? Let's review:

FOOD COST: By using a small number of ingredients, costs are easier to calculate and track. Inventory and ordering is simplified. Price fluctuations are easier to follow and pro-active solutions can be found.

AVOIDING SPOILAGE: By being able to rotate product quicker and more efficiently.

CONTROLLING ORDERING: Estimating how much of any ingredient used in weekly or bi-weekly production is easier. Fresh foods can be closely tracked and purchased on an as needed basis.

Take a look at the major chains menus and you'll see just how much cross utilization is used. I think you'll be surprised!

Tuesday, March 12, 2013

House Made Croutons Save Money, provide a Better Product

 
House made croutons save money by using product that would normally be discarded, and our herb recipe is far better than any crouton we could buy.

We save the heels of our bread as well as slices that go beyond the date of maximum freshness and save them in the reach-in for use in our crouton recipe later.


TIPS ON MAKING YOUR OWN CROUTONS:

Dice bread into cubes no larger than 1/2 inch. Larger croutons are harder to eat in a salad.

Allow for enough stale bread to accumulate to make a worthwhile batch of croutons. If stored covered in a cool, dry atmosphere, croutons will last for weeks on end.

Season using a mixture of dry leaf herbs. We use oregano, basil and thyme. We also add granulated garlic, granulated onion, kosher salt and black pepper. Moisten mixture with a quality vegetable oil. We use canola. Do not use butter or margarine, as these ingredients can cause the croutons to burn when toasting, and may go rancid during the storage period.

Layer the crouton mixture on parchment paper covered sheet trays. Bake in convection oven at 325 degrees,low fan setting; mix with a spatula every five minutes. Toast until lightly golden brown. Do not over-toast, as croutons will become bitter.

Monday, March 11, 2013

Par Prep Sheets Save Headaches, Money

Developing a preperation sheet that includes daily production pars is a great way to control food waste and insure consistency of product, as well as minimizing labor costs.

Prep sheets should be broken down into sections that make them easy to follow.

I'll follow up in my next post on the particulars...

This is our Prep Par Sheet for our lunch menu:

DELI MEATS   PULLS    
Ham     12 orders Burger Buns   6 pkgs
Turkey     12 orders Hot Dog Buns   2 pkgs
Corned Beef   12 orders Queso Wraps   2 + packs
Roast Beef   Fries     6 + bags
PREP. SALADS   S.P. Fries     4 bags
Tuna     1 6th pan Chix Brst     1 Cs, marinated
Chicken     2 6th pan Diced Chix  
Shrimp     1/2 pan Hot Dogs   1 + Cs
Egg     1/2 pan Burgers    
CHEESES   Burger, Bulk   5#
Swiss     Wings, Brd   1 + bags
American   Wings, Naked   1 + bags
Blue     1/2 pan
PROTEINS  
Eggs, boiled  
Eggs, sliced   2      "
Cheese, Shredded  
Bacon Slices   3 trays
Bacon. Diced   2 1/2 pans
Chicken Brst, whole   8 orders
Chicken Brst, Diced   3 6th pan
Hot Dogs     12
Burgers, Patty   10
Shrimp Appetizer               4
PRODUCE  
Leaf Lettuce   1 3rd pan
Lettuce, Salad   2 Lexans (WED & FRI)
Cucumbers   1 - 1/2 pan
Carrots     1 - 1/2 pan
Celery     1 - 1/2 pan
Craisins     1 - 1/2 pan
Pickles     3 6th pans
Red Onion     1 - 6th pan, plus back up of cleaned, not sliced
Fruit     1 gal. lexan
Diced Tomato     2 - 1/2 pan
Sliced Tomato     2 - 6th pans
BREADS  
Rye     2
White     2
Wheat     2
Hoagie     2  
 

Tuesday, March 5, 2013

Menu Design Tips part 2

For Starters

The most important thing to keep in mind when designing your menu is your customers. Who are you wanting to attract, based on the theme, style, price point and cuisine of your business? A sports bar, for example, will benefit from bright colors and fun graphics which suggest excitement and a party atmosphere -- just the things your customers want when watching the big game. If you've put together a unique menu with items that may be unfamiliar to some customers, art or photos of your items may help to increase sales.

Where Do Customers Look First?

Research shows that most people look to the top right corner of your menu first. This is a good place to feature one of your most popular menu items.

From there, a customer's eyes generally drift down and to the middle of the menu page. This is a good place to feature your most expensive menu item. Even though many may pass on this particular dish because of the high price, you can put other popular (and fairly expensive) menu items around your most expensive item. The contrast in prices makes people more likely to buy the items you place around your most expensive offering.

General Menu Layout Tips

Organization is also important, especially if you have a large menu. Generally, most designers organize their menu by the following categories:
  • Breakfast
  • Starters / Appetizers
  • Soups
  • Salads
  • Lunch
  • Dinner / Entrees
  • Beverages
  • Wine & Spirts
Other restaurants may feature specialty headings such as "Seafood" or "Vegetarian," or offer a separate dessert or wines and spirits menu. It's a good idea to list headings in a large, eye-catching font. This will help your customers find exactly what they want to satisfy their hunger.

Special Tip: There are no hard and fast rules when it comes to organizing your menu, but it's good to set a pattern and stick to it. Use a similar font for all your menu section headings, and another for your item descriptions. If you serve a full menu, it makes sense to list breakfast first. Drinks and beverages are often listed on the backside of menus for easy access, as this is typically the first order your servers will take.

Highlight Your Assets

Once you have decided how you will organize your food and drinks, think about what items you'd like to highlight. Small eye-catching graphics for "New" or "Chef's Choice" items can lead to an increase in orders and sales. Borders and boxes are also a great way to draw attention to special parts of your menu. Specials cards are another excellent way to showcase your best cuisine, and can be as intricate or as simple as you like. Borders and specialty graphics are especially effective for specials cards, as they help to draw attention to your inserts.

Special Tip: If your customers have trouble pronouncing the names of your dishes, number them! It's much easier to order a #7 than it is to try to puzzle out how to pronounce an unfamiliar name.

And for Dessert...

The best part about designing your own menu is flexibility - you can change it any time you want, to reflect your own menu changes. Many restaurants choose to buy menu covers made from leather or synthetic materials. You can then swap pages in and out as your menu changes and the theme and atmosphere of your restaurant continues to develop.

Sunday, March 3, 2013

Estimating Food Amounts for a Buffet


One of the toughest challenges when planning a party is trying to decide how much food is needed. I'd love to say that there is a fool-proof formula to solve this dilemma but, in the end, the answer to this question involves more art than science.
Many factors come into play when you make your plans including the length of your party, the type of food you'll be serving, the composition of men, women and children in your group, as well as the richness of the food you plan to serve. The time of your party is also very important. An after-dinner cocktail party requires much less food than an all-afternoon barbecue.
Fortunately, there are a number of general principles you can follow when planning your menu and recipes. Begin by following these "rules of thumb" and write down your initial thoughts. Then look at the big picture several times over a period of a few days to make adjustments to your plan.
  • Always round up your estimates, don't round them down.
  • Anticipate which food selections will be most popular and serve more of them than the general portion guidelines suggest. For example, shellfish appetizers are always popular, so serve as much as your budget allows.
  • The more choices you offer, the smaller your calculation of individual portion size should be.
  • That said, you can assume your guests will taste everything on a buffet, but the tastes will be small. However, overall consumption per individual will be greater than if there were fewer choices.
  • Add "bulk" items to your menu. For a sit-down dinner have plenty of bread to fill in any hungry spots. When hosting a cocktail party, nuts, olives, pretzels, etc. provide a little extra security that you'll have enough for all but requires no extra work.
Here are basic guidelines for individual serving sizes of various foods. Multiply these estimates by your number of guests and, once again, always round up your estimates.

Portion Size Per Person

Hors D'oeuvres
  • 6 bites when preceeding a meal.
  • 4 - 6 bites per hour when hors d'oeuvres are the meal.
  • The longer your party and the larger your guest list, the greater the number of selections you should offer.
The Main Meal
  • Poultry, meat or fish - 6 ounces when you have one main dish, 8 ounces when you offer two or more main courses.
  • Rice, grains - 1.5 ounces as a side dish, 2 ounces in a main dish such as risotto.
  • Potatoes - 5 ounces
  • Vegetables - 4 ounces
  • Beans - 2 ounces as a side dish
  • Pasta - 2 ounces for a side dish, 3 ounces for a first course, 4 ounces for a main dish
  • Green Salad - 1 ounce undressed weight
Desserts
  • 1 slice cake, tart or pastry
  • 4 ounces creamy dessert such as pudding or mousse
  • 5 ounces ice cream
  • When serving two of the above, reduce each by a little less than half.

A Few Other Menu Planning Tips

  • Don't repeat a main ingredient. For example, don't serve a shrimp appetizer and shrimp main dish.
  • Consider the colors of the food that will be served together and make sure there is variety.
  • Offer both hot and cold foods on a buffet.
  • Mix textures such as a crisp potato galette served with a soft vegetable puree as side dishes.

Saturday, March 2, 2013

Secret Menu Planning Tips part 1

This is kind of a random post. I'm sure that this post will leave you asking more questions than it attempts to answer! If any questions come to mind, leave a comment and I'll try my best to answer.

Here are some random menu design tips:

#1) Make sure your menu takes advantage of cross-utilization of product. An example would be a menu that consists of various distinctly different choices that share many of the same ingredients. For instance, the menu might offer deli sandwiches, burgers, chicken wraps and fish and chips. What do these items have in common? All can come with the same sides available (fries, coleslaw, potato salad or fresh fruit), the deli sandwiches, burgers and wraps share the same sliced cheeses, lettuce, tomato and condiments...

...see where this is going? A complete menu can be built upon as few as forty main ingredients and cross-utilize upwards of seventy percent of those ingredients. A good example are fast food operations, where the use of cross-utilization is most apparent. Taco Bell has taken the concept to new heights!

Why worry about cross-utilization?

     Simpler pricing and price tracking.
     Easier to organize storage.
     More efficient storage / rotation of product.
     Simpler cost control.
     Simplified inventory / ordering.
     More efficient use of labor for food prep / delivery.
     Focuses on customer's most popular preferences (why carry an item, say, sliced pepper jack cheese, if it doesn't appeal (sell) to your clientel?


#2) Always begin your menu listing with your most expensive item (which should also offer the most appeal), then list your mid-range priced items, finally ending with your lowest priced. Studies have shown that with this set up, people tend to choose the high and mid-priced entrees most often.

EXAMPLE:

Seared Salmon Steak $14.95
Grilled Chicken Alfredo  $12.95
French Dip Au Jus $9.75
All American Half Pound Burger $8.95
Buffalo Chicken Finger Basket $7.75
Double Decker Grilled Cheese Pinini $6.95


#3) Make sure your menu is LEGIBLE. Too small of print, undefined "wall" of text, overly wordy descriptions, poorly contrasting color of type to background, hard to read fonts, etc. can weaken your menu and lose you money. If you're unsure about the actual design, have an expert lay out your menu. Be wary and look at a designer's portfolio before hiring them to see if they're capable of meeting your expectations.


That's it for now...

Happy cooking!


Wednesday, February 27, 2013

Food Safety Date Marking Facts


Food safety is a priority in any kitchen. Here is a set of questions and answers that will help you keep your food safe for consumption:

What is date marking and how is it used?

Date marking is an identification system for ready-to-eat foods held over 24 hours so you know how old they are. The system helps to identify when food is to be discarded. Date marking ensures food safety, and it is the law.


How do I know if a food needs to be date marked?

If you answer “yes” to all five of these questions, then the food MUST be date marked.

1. Does the food require refrigeration?

2. If commercially packaged, has the original package been opened?

3. Could the food be eaten just like it is, regardless of temperature? Examples: cold cooked meats, potatoes, pastas, soups, stews, cole slaw, tartar sauce, sour cream and cottage cheese.

4. Is the food potentially hazardous? Will it mold or grow bacteria? Will the food support bacterial or viral foodborne organism growth? Example: listeria monocytogenes is associated with soft cheese.

5. Will the food be in the establishment for more than 24 hours? This counts even if the food is, or will be, mixed with something else to form a new product.


If the food has an expiration date on it, isn’t that the same as a date mark?

No, the expiration date is the date through which the manufacturer guarantees the food will meet their quality standards. Date marking ensures the safety of the food.


The establishment goes through food so fast! Even if it is going to be gone in less than 4 to 7 days, do I still need to date mark it?

Yes, if the food is not going to be served or discarded within 24 hours, it MUST be date marked.


When should I discard food?

When refrigeration is at 41°F or below, discard within 7 days (date of prep/opening + 6days).


What if I freeze the food?

Freezing food pauses the date marking clock but does not reset it. For example, if a food is stored at 4°F for 2 days and then frozen, it can still be stored at 4°F for 2 more days when it begins to thaw.


What if I mix the food with something else?

When foods are mixed together the date of the oldest food becomes the new date for the mixed food. For example, if today is Wednesday, and you are mixing a food that was marked on Monday with a food that was marked Tuesday, the mixed food marking would be based on a starting date of Monday.


Are there any exceptions? Yes,

 Uncut portions of processed cured meats packaged in cellulose, such as salami and bologna, do not need to be

date marked.

 Hard cheeses like Asiago old, Cheddar, Cruyere, Parmesan, Romano and Sapsago do not need to be date

marked.

 Semisoft cheese like Asiago fresh, Soft, Blue, Brick, Colby, Edam, Gouda, Monterey, Pasteurized processes

cheese, Provolone and Swiss do not need to be date marked.

 Commercial acidified dressing like mayonnaise and Thousand Island do not need to be date marked.

 Soft cheeses like Brie, Cotigo, Cottage, Ricotta and Teleme MUST be date marked.